Methods to Enable and Disable Indexes in SQL Server

Disable indexes feature is available in SQL Server 2005 and all the later versions to prevent user access to the index. In Microsoft SQL Server 2000 and earlier versions of the SQL Server only have a DROP index and RE-CREATE index option. Disable indexes are very useful feature when we need to recognize whether the indexes are useful or not. The index definition remains in metadata when we are disabling an index and index statistics are kept on non-cluster indexes. Let’s continue understand the enable and disable index in SQL server task.
Table of Content
However, if you are disabling a clustered index on the table, even then the data still remains on the table, but the table won’t be available for users access. The data of the cluster index will be unavailable for any DML (data manipulation language) operations until the index is dropped or rebuild.
In this blog post I will show you how to disable and enable the index by using SQL Server Management Studio or Transact-SQL
User Queries to Disable and Enable Index in SQL Server
Before we move further to find out the ways to disable index SQL Server & then enable index SQL Server, let’s have a look at the user queries. This can help us get a clear understanding of the entire task.
Now, that we have gone through the user queries, let’s proceed to know all the ways to disable & enable the indexes.
SQL Server Disable Index Using Transact-SQL
In Object Explorer, click New Query and run the following query on AdventureWorks database to disable IX_Address_StateProvinceID index on Person.Address table

SQL Server Disable Index with Management Studio (SSMS)
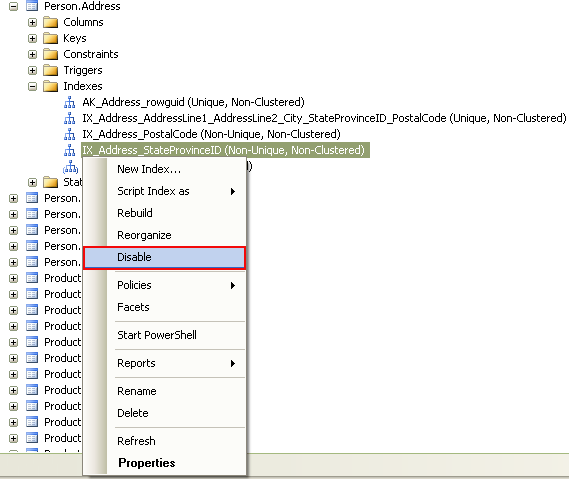
In Object Explorer expands the database by clicking on the plus sign until you get the IX_Address_StateProvinceID index. Then right click on the IX_Address_StateProvinceID and from the drop down list select Disable. Verify the Disable Indexes and click OK.
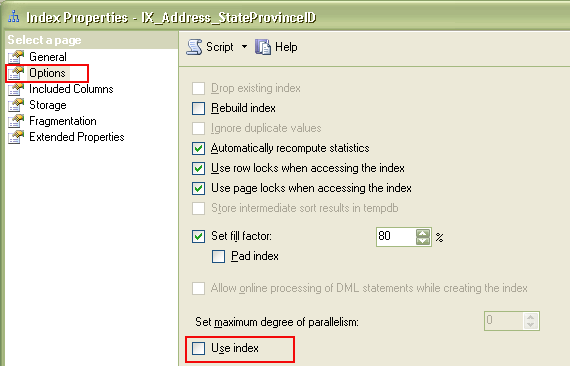
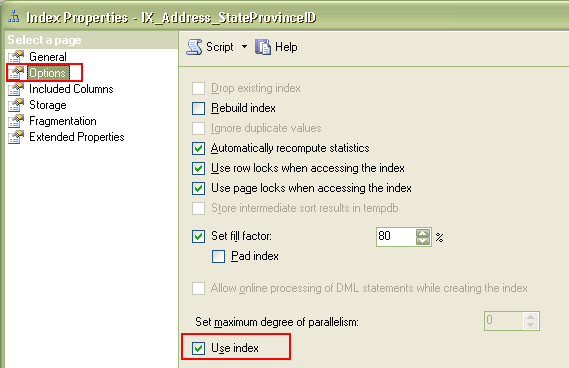
You can also disable an index form Index Properties dialog box
Click Options under Select a page, column and uncheck Use index option as shown below
Enable an Index using Transact-SQL
There are two different T-SQL statements to enable indexes
- ALTER INDEX REBUILD Statement
- CREATE INDEX WITH DROP_EXISTING Statement
Enable Index using ALTER INDEX REBUILD Statement

Enable Index using CREATE INDEX WITH DROP_EXISTING Statement

Enable Index using SQL Server Management Studio (SSMS)
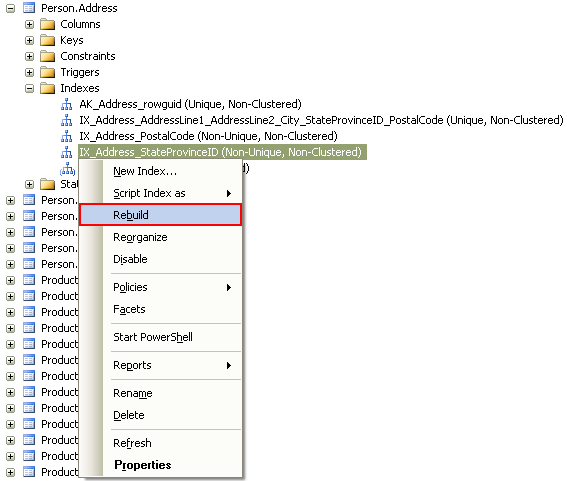
In Object Explorer expands the database by clicking on the plus sign until you get the IX_Address_StateProvinceID index. Then right click on the IX_Address_StateProvinceID and from the drop down list select Rebuild. Click OK on Rebuild Indexes dialog box, to enable the index
You can also enable an index form Index Properties dialog box
Click Options under Select a page, column and check Use index option as shown below
Tackle Corrupt Indexes in SQL Server
There are often times when users face corruption in SQL Server objects. Evidently, this corruption can even occur in the SQL Server indexes. Now, users must know the right way to get rid these corruption issue. Therefore, the recovery software for SQL Server is the right choice for them. Download the software & get the perfect solution to tackle all sorts of corruption issues with SQL indexes & other objects.
Conclusion
Now after going through all the methods, we are hoping that users are aware of the right method to execute their SQL server disable index as well as enable index task. make sure to not miss any of the steps mentioned above to alter index SQL server in a safe manner.
