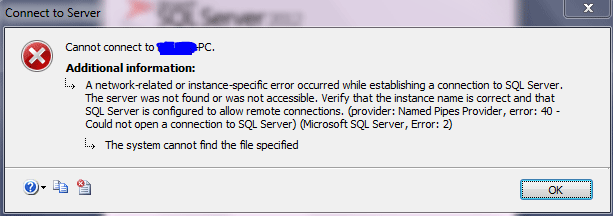
Fix SQL Server Management Studio Error 40

Synopsis: The sole purpose of this article is to explain the SQL server error 40 & its possible solutions to users. The task isn’t quite tough to tackle if the users are aware of the right techniques. Just like error 983, error 1105, error 17053, etc, this also troubles users with a message that says could not open a connection to the SQL server database. Let’s dive deep into the topic with expert guidance.
Table of Content
Introduction
Evidently, sometimes you may get the issue to connect to SQL Server and get the error message error 40 could not open a connection to SQL server 2016.

This error: 40 – could not open a connection to SQL server message occurs due to several reasons and is the most frequent error message happens when we connect to SQL Server. In this blog post I am sharing the technique to fix SQL Server Error 40.
Method to Resolve SQL Server Error 40
-
- First of all, you have to make sure that your SQL Server is running fine.
- Open SQL Server Configuration Manager and click on SQL Server Services to check the state (Stopped/Running) of SQL Server (SQLEXPRESS) and also check SQL Server (MSSQLSERVER) and SQL Server Browser is in the Running state. There is a possibility that your SQL Server instance is not running.

-
- Now expend SQL Native Client 10.0 Configuration, click on Aliance, you always have to make sure that the Aliance should be empty. Otherwise, its not going to solve the error 40 in SQL server.
- Open Control Panel, click on System and Security and select Windows Firewall and click on Advanced Settings to check the SQL Server Default Portal 1433.
- Windows Firewall with Advanced Security window will open, Under the Windows Firewall with Advanved Seccurity on Local Computer, click on Inbound Rules and on the right panel, under the Action column, click on New Rules to move one step closer of solving this error 40 smartly.

-
- New Inbound Rule Wizard window will open, click on Protocol and Ports under the Steps column and enter SQL default port1433 in Specific local ports box. Then click on Name under the Steps column and enter a SQL Port Name in Name box and click on the Finish button.
- From the SQL Server Configuration Manager, select Client Protocols then right-click on the TCP/IP and select properties to check the default port 1433.
- Open SQL Server Management Studio, under the Object Explorer column right click on the server name and form drop down window click on Properties.
- In Server Properties windows, click on the Connections under Select a page, column and select Allow remote connections to the server option and click on Ok button.

Conclusion
Finally, in this article, we have discussed how to fix SQL Server Error 40. This error message could be for TCP/IP connection or Named Pipes connections. To avoid these types of errors use dynamic ports when database engines have been configured
